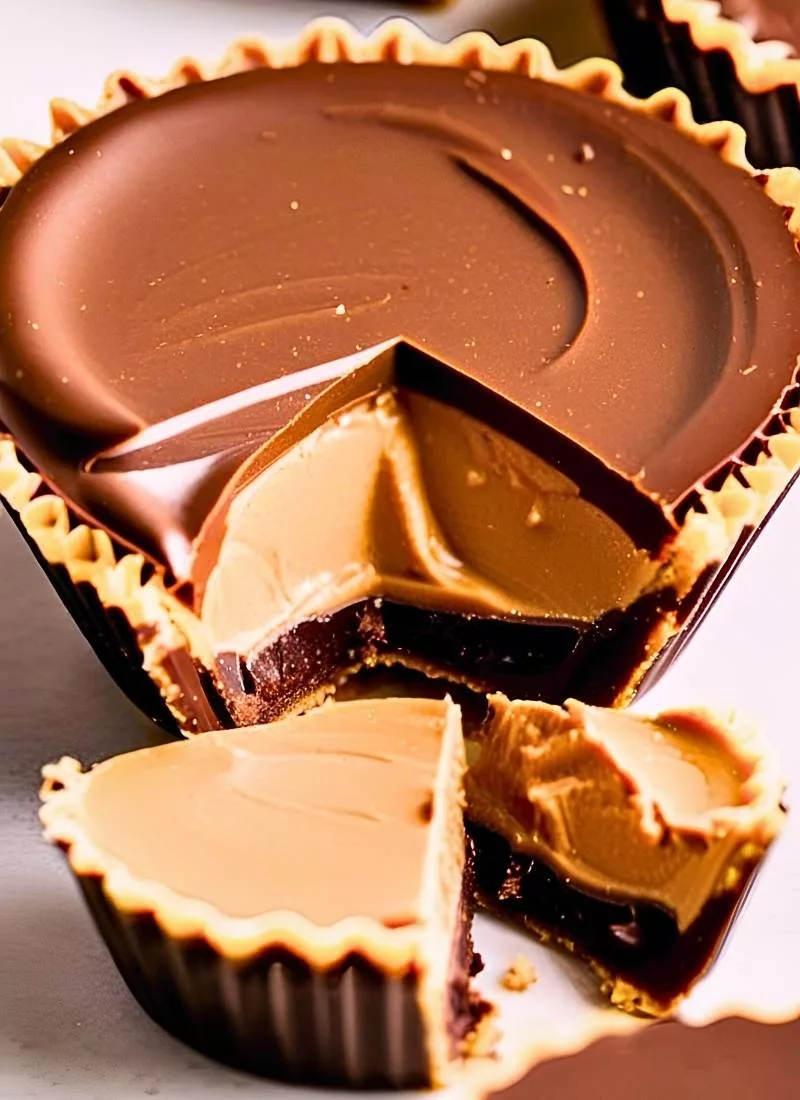
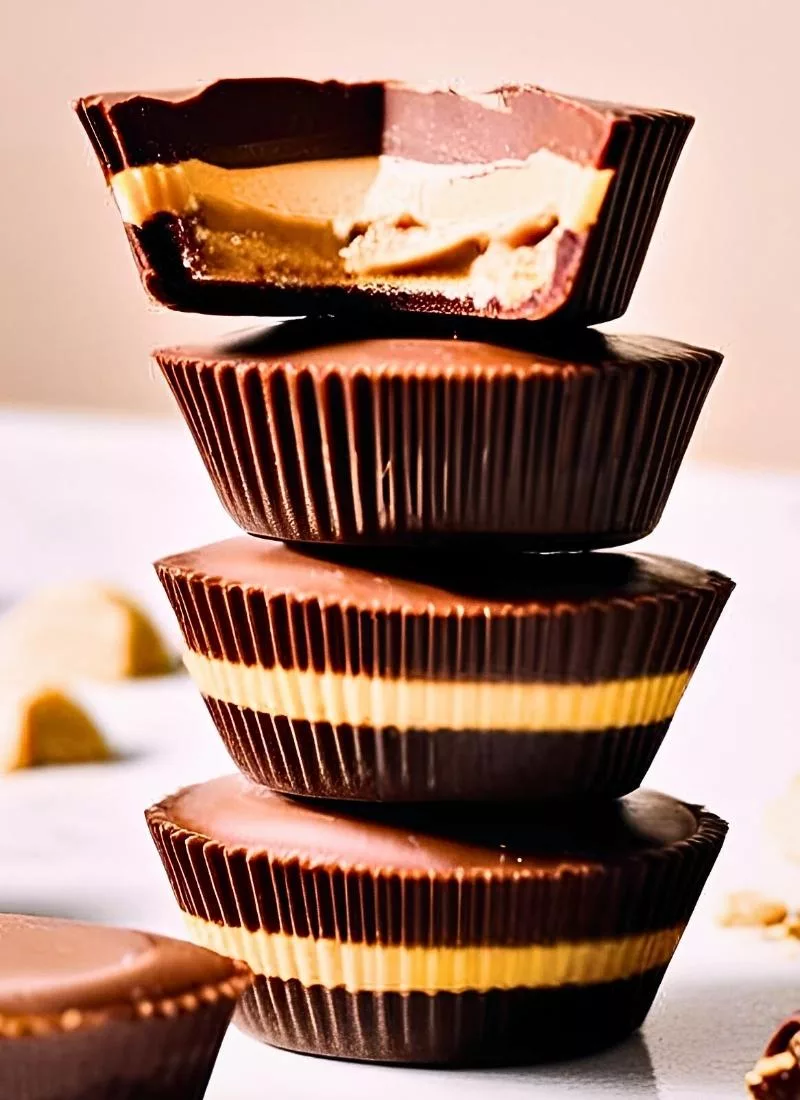
What if I told you that you could make Homemade Reese’s Peanut Butter Cups that taste better than the store-bought kind? Yep, I said it. These little bites of heaven are the ultimate love letter to anyone obsessed with that chocolate-and-peanut-butter combo.
They’re rich, creamy, and oh-so-addictive. For real, my friends lose their minds every time I bring these out. This no-bake recipe comes together fast, making it perfect for those days when you need a sweet fix without the hassle.
Ready to jump into this chocolatey goodness? Let’s do it.
Why You’ll Love This Recipe
Seriously, who doesn’t adore Reese’s Peanut Butter Cups? Here’s why this homemade version is about to steal your heart:
- Insanely Easy: No oven, no stress—just a microwave and a little chill time.
- Customizable: More chocolate? Less salt? You call the shots.
- Crowd-Pleaser: Perfect for parties, late-night snacks, or secret stashes (no shame here).
- Nostalgia Overload: That creamy peanut butter and chocolate mix takes you right back to simpler times.
- Fast and Furious: Done in under an hour—sweet relief in a snap.
The Best Homemade Reese’s Peanut Butter Cups You Need
So, here’s the scoop: I’ve tried tons of Peanut Butter Cups Recipes, and this one? It’s the champ. The chocolate’s smooth, the filling’s got that perfect sweet-salty-crumbly thing going on, and it’s all just so good. Back in the day, my brother and I would hoard Reese’s from our trick-or-treat bags, but these homemade ones would’ve blown those out of the water. I started tinkering with this recipe after a late-night craving hit, and now it’s my go-to for every dessert table. Trust me, one bite and you’ll wonder why you ever settled for the store stuff.
Ingredients For Homemade Reese’s Peanut Butter Cups
Alright, let’s get to the good stuff. Here’s what you need for these mini desserts that’ll have everyone begging for more.
Chocolate Coating
- 12 ounces high-quality dark or milk chocolate: Splurge a little—it’s worth it.
Peanut Butter Filling
- 1 cup creamy peanut butter: Smooth is the way to go here.
- 1 cup powdered sugar: For that melt-in-your-mouth sweetness.
- ⅓ cup graham cracker crumbs: The secret to that classic Reese’s texture.
- ¼ teaspoon salt: Just a touch to keep it balanced.
Simple, right? Yet these ingredients turn into something very special.
How to Make Homemade Reese’s Peanut Butter Cups (Step-by-Step)
Time to roll up your sleeves and make some Reese’s Peanut Butter Cups. It’s easier than you think, and I’ve got your back every step of the way.
Step 1: Melt the Chocolate Like a Pro
Grab your 12 ounces of chocolate and toss it into a microwave-safe bowl. Set the power to medium—too hot and it’ll turn into a disaster. Zap it in 30-second bursts, stirring well each time. You’re aiming for a silky, pourable consistency, not a burnt mess. It usually takes me about 90 seconds, but watch it closely.
Pro Tip: If it gets lumpy, a tiny drop of coconut oil can smooth it out—lifesaver move!
Step 2: Build the Chocolate Base
Line a muffin tin with paper liners—mini or standard, your pick. Spoon about 1 teaspoon of melted chocolate into each one. Use the back of a spoon to nudge the chocolate up the sides, coating the bottom and edges completely. It’s like making little chocolate cups to hold the filling. Pop the tin in the freezer for 30 seconds to firm it up, then check for weak spots—add more chocolate if you need to. Chill it in the fridge until it’s solid.
Pro Tip: Swirl the tin a bit as you spread—it’s an easy way to get even sides.
Step 3: Mix the Peanut Butter Filling
In a bowl, combine 1 cup creamy peanut butter, 1 cup powdered sugar, ⅓ cup graham cracker crumbs, and ¼ teaspoon salt. Stir it up until it’s thick and blended. It might look dry at first, but keep mixing—it turns into a perfect, scoopable filling. This is the soul of your Homemade Reese’s Cups, and it’s so tempting to sneak a taste.
Pro Tip: Too sticky? Add a sprinkle of extra graham crumbs—just a little does the trick.
Step 4: Fill the Cups
Scoop about 2 teaspoons of peanut butter mix into each chocolate shell. Press it down gently with your fingers or a spoon so it’s flat and fits nicely. Don’t overstuff—you need space for the top layer. It’s almost like you’re crafting your own Reese’s Peanut Butter Cup Recipe, and it feels pretty awesome.
Pro Tip: Lightly dampen your fingers to keep the filling from sticking everywhere.
Step 5: Top It Off
Pour more melted chocolate over each cup—about 1-2 teaspoons, enough to cover the filling. Tap the tin on the counter to level it out and chase away air bubbles. Slide it back into the fridge for 20-30 minutes until everything’s set. Pull them out, and you’ve got Homemade Peanut Butter Cups ready to rock your world.
Pro Tip: If the chocolate’s thickened, give it a quick 10-second microwave burst to loosen it up.
Tips for Success
Want your Reese’s Cups to shine? Here’s how to nail it:
- Start with room-temp peanut butter—it blends way easier.
- Don’t skip the chill time; it keeps the chocolate crisp.
- For a shiny top, let the chocolate cool slightly before the final pour.
- Cheap chocolate can get weird and waxy—stick to the good stuff.
- Use sturdy liners; flimsy ones are a pain to peel off.
What to Serve With Homemade Reese’s Peanut Butter Cups
These no-bake treats are amazing solo, but pair them up for extra wow:
- Cold Brew Coffee: Cuts the sweetness with a bold kick.
- Sliced Apples: A fresh, crisp contrast to the richness.
- Vanilla Ice Cream: Spoon it alongside for a creamy dream team.
- Salty Pretzels: That sweet-salty combo? Absolute perfection.
Nutrition Information & Calories
Here’s the rundown on these Chocolate Lover gems (per cup, based on 12 servings):
- Calories: ~220—totally worth it.
- Fat: 14g—hello, peanut butter and chocolate goodness.
- Carbs: 20g—sweet fuel for your soul.
- Protein: 4g—a little boost from the peanut butter.
- Sugar: 16g—just the right amount of happy.
Variations & Substitutes
Switch it up to match your vibe:
- For a lighter take, use dark chocolate (70%+) and drop the powdered sugar to ¾ cup.
- Love crunch? Swap graham crumbs for crushed peanuts or pretzels.
- Going dairy-free? Pick vegan chocolate and double-check your peanut butter.
- Craving flair? Add a pinch of cinnamon to the filling—trust me.
Serving & Storage Tips
Leftovers
Got some Homemade Reese’s Cups left? (Impressive self-control!) Store them in an airtight container in the fridge for up to two weeks. Stack them with parchment paper between layers to avoid a sticky mess. They’ll stay fresh and fabulous.
Reheating Tips
No reheating here—these shine cold or at room temp. If they’re straight from the fridge, let them sit out for 5-10 minutes to soften up. That creamy texture really pops when it’s not too chilly.
What Others Are Saying
These Peanut Butter Cups have some serious fans. Check out what people are saying:
- Katie: “I brought these to a potluck, and they vanished—people were obsessed!”
- Tom: “Ate four before I blinked. Best mistake ever.”
- Lila: “My husband said these beat the original. I’m framing that compliment.”
- Ben: “That graham cracker twist? I’m never going back.”
Homemade Reese’s Peanut Butter Cups FAQs
Can I use natural peanut butter?
You can, but it might get oily and separate. Stick to creamy, stabilized stuff for the best texture.
How do I avoid a melty mess?
Keep your hands cool, work quickly, and chill the cups well before handling. It’s all about timing.
Can I make these ahead?
Absolutely! They hold up in the fridge for weeks or freeze for 3 months—perfect for planning ahead.
In Conclusion
There you go—my Homemade Reese’s Peanut Butter Cups that I’m honestly a little too proud of. They bring back all those happy candy-bar memories, and I hope they do the same for you. They’re quick, they’re fun, and they’re basically a love note in dessert form. So, grab your creamy peanut butter, melt that chocolate, and make something awesome. I’d love to know what you think—drop a comment, save this on Pinterest, or share it with your people. Let’s spread the chocolate and peanut butter joy, okay?